
![]()
Gamma Curves and Fingerprinting
This article provides information and tips for creating a Gamma curve through Fingerprinting.
 It is highly likely that you will need more than one Gamma curve because each combination of screen, angle and stylus has a slightly different characteristic. It is also highly likely that you will create additional Gamma curves for different substrate materials, because poly/foil and paper have different print characteristics. Many engravers create Gamma curves for specific printing customers because of press differences.
Fingerprinting is best done on a production press. The proof press is a decent representation but it is not the production press – it doesn't run at the same web speed or with the same ink viscosity. If you do not test on a production press, you will not achieve the best results. You might get away with only the proof press if you have a good comparison of the results of the proof press compared to the production press, but success with this is limited.
 Grayscales
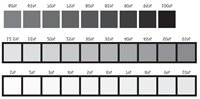
We have provided a sample grayscale image below. These scales have every percentage from 1-10%, a 12.5%, then a tone every 5%. This makes 29 possible points for measuring. There are a lot of points on the highlight end because these are so important for reproducing fleshtones and vignettes.
 Water-based vs solvent-base inks
There are differences between these two ink types but most adjustments are made with the depth of the cell and not the curves. It may be necessary to adjust the Gamma curves for different inks, but it is not always necessary. Normally, a move from solvent-based to water-based ink is done by decreasing the sharpness of the stylus, so a 120° for solvent becomes a 130° for water.
Procedure
Start with a single cylinder and engrave the four different grayscales at the screen/screen angle/stylus recommendations below. This cylinder will not use a corrected Gamma curve, so either leave the curve settings empty or select the Linear curve for this engraving.
1. Engrave the first cylinder
Engrave the set of four grayscales on a cylinder. Do not worry about trying to proof the grayscales in register to create a CMYK image; it is unnecessary at this point. Set the Gamma curve to a Linear curve. Use the standard screen/screen angle/stylus angle set in use by your company. The following is an example:
Yellow – 60 l/cm @ 45° with 120° stylus
Magenta – 70 l/cm @ 60° with 110° stylus
Cyan – 70 l/cm @ 30° with 120° stylus
Key – 92 l/cm @ 34° with 110° stylus
2. Chrome the cylinder after engraving. You don't want to evaluate in copper when chrome is used in production.
3. Print and measure and record the densities. Use something like the attached sheet to record the densities. Most certainly the highlight tones will be too small, the midtones will be closer, and the shadows much too dark. This is expected with gravure and is the reason fingerprinting Gamma curves is so important.
4. Create a new Gamma curve.
Refer to the Collage On-line help.
5. Engrave the second cylinder, but this time, use the new Gamma curves. The results should be much better! (You can de-chrome the first cylinder if you want to save copper and if there is room for the next engraving. See the next paragraph.)
When engraving the second test cylinder, you may wish to add some test images that can be proofed as CMYK image. Some examples below. Pick a few, like the composite grayscale images and some others, and engrave them on the cylinder. These will aid you in seeing color balance. If things look good on the second attempt, you are encouraged to put the cylinder into your production press in one station at a time and print with production inks and speed.
Check the single color results and make the final adjustments to the Gamma Curve if necessary. The goal is to make the print come up to color as quickly as possible with minimal ink adjustments on press. The more work you do with the Gamma curve, the better things will be on press.
Fingerprinting is not a process that will be done in 1 hour, it will take a bit of time, but the results will be seen with reduced setup times on press and less press waste.
Sample files to download
Fingerprint Density Record
Fingerprint Small Test Image
If you have any questions, please contact OHIO.
ABOUT US
OHIO Gravure Technologies in Dayton, Ohio USA designs and manufactures advanced equipment for the global gravure printing market. The Engineering, Software Development, and Manufacturing groups work to provide innovative solutions to improve quality and productivity, such as the award-winning Hybrid Engraving System. Our engineering specialty since 1980 is our sub-micron accurate cutting system (Vision engrave head). We provide installation and support for our electromechanical engravers and the prepress layout software Collage for gravure printing.
20-Jul-2023
SERVICE
PRODUCTS
CONTACT
Ohio Gravure Technologies Inc
4401 Lyons Road
Miamisburg Ohio USA 45342
phone +1 937.439.1582
email
 Follow us on Facebook